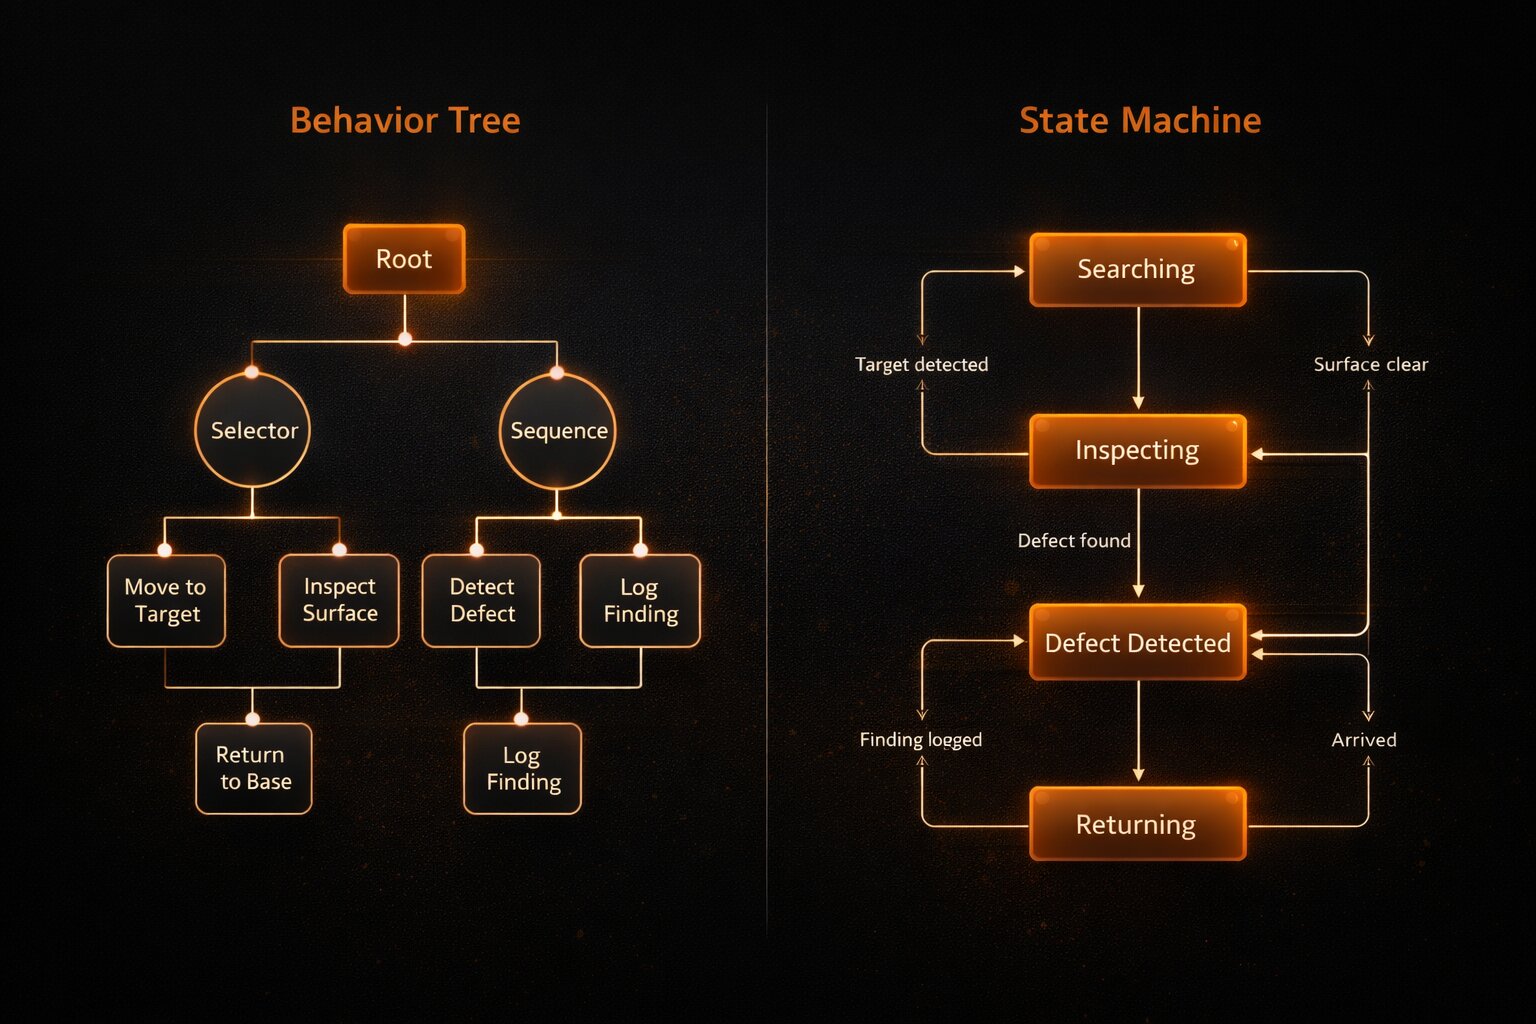
- The real question isn't BT vs FSM — it's how you express normal behaviour, interruptions, retries, and recoveries in a way that's understandable and testable
- FSMs are best for clear, auditable mission modes with explicit transitions; BTs are best for complex task execution with local retries and fallbacks
- Most real deployments use a hybrid: FSM for mission modes, BT for task execution inside those modes
- Failure mode design matters more than diagram format — decide your recovery strategy before you commit to an architecture
- Without observability (mode visibility, event timelines, reason codes), neither approach will earn operational trust
Why This Question Matters (and Why Most Teams Ask It Too Late)
If you've ever watched an autonomy demo, the behaviour looks clean: start mission, navigate, do the task, return home. The diagram usually looks clean too.
But a robot operating on a real site isn't following a diagram — it's managing interruptions.
During a single inspection run, you'll hit some mix of:
- safety interruptions (zone breaches, e-stops, collision warnings)
- degraded sensing (dust, lighting shifts, occlusion, reflective surfaces)
- comms dropouts and timeouts
- blocked routes and re-plans
- payload issues (sensor unhealthy, calibration drift, storage full)
- "continue vs stop" decisions under uncertainty
So the real question isn't "Behaviour Tree or State Machine?"
How will we express normal behaviour, interruptions, retries, and recoveries — and keep it understandable, testable, and safe?
TL;DR — What to Choose, in Plain English
Behaviour Trees (BT) and Finite State Machines (FSM) aren't competing "styles." They're different tools that trade off clarity, composition, and how you model recovery.
- If you need clear, auditable mission modes and explicit transition logic, you'll likely want an FSM at the top.
- If you need to build complex tasks out of reusable parts (with retries, fallbacks, and preconditions), you'll likely want a BT inside those tasks.
- In operations, the most common "works in the long run" pattern is hybrid: FSM for mission modes, BT for task execution.
One more blunt truth: the biggest operational wins come from your fault and recovery strategy, not the diagram format you pick.
Quick Definitions
Finite State Machine (FSM)
An FSM models behaviour as states — what the system is doing now (e.g., Navigate, Inspect, Return, Fault) — and transitions, the conditions that move you between states.
Behaviour Tree (BT)
A BT models behaviour as a tree of nodes that are evaluated ("ticked"). Each node returns a status like success, failure, or running. The power comes from composition primitives that map neatly to operational reality:
- Sequences: do A then B then C
- Selectors / fallbacks: try A, otherwise try B
- Decorators: retry up to N, timeout, only-if precondition
What Breaks in the Real World
Here's a simple thought experiment. Say your robot is doing a standard inspection loop:
- navigate to asset
- align to viewpoint
- capture data
- validate capture quality
- log/report
- move to next waypoint
Now add just three interruptions: a human enters the zone during alignment; localisation confidence drops during navigation; the camera reports "frame corrupted" intermittently.
If your behaviour logic can't express those interruptions cleanly, you'll get one of two outcomes:
- the robot "gives up" too easily (too many safe stops, low mission completion rate), or
- the robot "pushes through" in ways that erode trust (unsafe-looking behaviour, confusing recovery loops).
This is the lens you should use when choosing BT vs FSM: how does the architecture handle exceptions without becoming unreadable?
A Worked Example — What Mission Logic Actually Has to Do
Imagine a robot doing a recurring inspection workflow in an operational environment (plant, yard, rail corridor, warehouse). The "mission" isn't a single action — it's an end-to-end loop with governance:
- dispatch mission (why are we going?)
- run pre-checks (are we safe and healthy enough to start?)
- navigate and manage access constraints
- execute inspection tasks at multiple locations
- validate evidence quality (so findings are trustworthy)
- report findings to owners and systems
- return / recharge / handoff
If you map this to a diagram, you quickly realise there are two different kinds of logic happening at once:
- Mission-mode logic: what phase are we in, what is allowed, how do we safely pause/stop/handoff?
- Task-execution logic: how do we actually perform "inspect this thing," including retries, fallbacks, and local recovery?
That distinction is the reason hybrid architectures are so common.
Failure Modes Are Patterned — Design for Them
In most deployments, failures cluster into a few predictable categories. A good way to think about it is: what failed, and what's the right operational response?
| Failure mode (what happened?) | What you want the robot to do (desired recovery) | Where it's usually cleanest to model it |
|---|---|---|
| Zone breach / safety trigger | Stop motion, go to safe state, wait for clear, resume deterministically | FSM (global safety pause) + BT preconditions |
| Comms dropout | Continue safely with local autonomy or hold position; store-and-forward; time out to handoff | FSM for "Degraded/Paused"; BT for local task retries |
| Localisation confidence drops | Slow down, re-localise, retry navigation; escalate if repeated | BT (local recovery) inside navigation task |
| Route blocked | Replan; if no route: backtrack / alternative waypoint / escalate | BT (fallbacks) inside navigation task |
| Sensor unhealthy / payload degraded | Switch to degraded inspection mode or fail the task with a reason code | BT (pre-checks + fallbacks) + FSM for global "Degraded" mode |
| Data quality fails (blurry / occluded) | Reposition, recapture N times, then mark inspection incomplete and escalate | BT (retry/timeout wrappers) |
| Storage full / upload backlog | Pause mission or skip low-priority captures; return-to-base | FSM (mission-level constraint) + BT guardrails |
Notice the pattern: global governance tends to live naturally in an FSM; local recovery tends to live naturally in a BT.
How FSMs Behave Under Exceptions
FSMs are excellent when the system can be described as a small set of high-level modes with clear transitions. Many stakeholders immediately understand: Standby → Navigate → Inspect → Return → Standby.
Now add the three interruptions from above. In an FSM-only design, you typically have to introduce new states such as PausedForSafety, RecoverLocalisation, RetryCapture, and Fault.
The challenge is that each exception can be triggered from multiple states. That means transitions multiply quickly — safety pause can happen during Navigate, Align, Capture, and Report. This is where teams get "transition spaghetti": the diagram grows, and the logic becomes hard to audit and hard to test comprehensively.
FSMs can still work well here — but only if you're disciplined about structure.
How Behaviour Trees Behave Under Exceptions
BTs shine when the behaviour is naturally composed of smaller behaviours with local recoveries. Instead of adding states for every exception, you usually represent exceptions as:
- a precondition (e.g., "zone is clear")
- a fallback (e.g., "if navigate fails, attempt relocalisation then retry")
- a retry/timeout wrapper (e.g., "retry capture up to N times, then escalate")
The key benefit isn't that BTs are "more advanced." It's that they let you make recovery behaviour local, explicit, and reusable, without exploding global transitions.
When FSMs Win
FSMs tend to win when you need:
- Clear, explicit modes that ops and safety stakeholders can reason about (e.g., Standby, Navigate, Inspect, Return, Paused, Fault)
- Traceability around "we only enter mode X if checks Y pass"
- Straightforward mission flows where exceptions are handled by a small number of system-wide modes (Paused, Fault, Manual override)
How to keep FSMs healthy as complexity grows: keep the FSM focused on mission modes, not task detail; treat "pause/fault/override" as system-wide concerns; consider hierarchy to prevent flat diagrams from ballooning; define test cases by events and ensure every event has a deterministic outcome in every relevant mode.
When BTs Win
BTs tend to win when you need:
- Composability: complex tasks built from smaller behaviours you can reuse
- Local recovery: "if this step fails, do this recovery, then continue"
- A clear mapping from failure mode to recovery behaviour
What to watch for: BTs can become hard to interpret if you don't standardise node naming and outcomes. Without good observability (logs/events), a BT can feel like a black box.
A Simple Decision Framework
Use these six questions to choose quickly and defensibly.
- Do you need a small set of high-level modes that non-roboticists must approve and audit? If yes, you almost certainly want an FSM for mission mode control.
- Does the task logic involve lots of retries, fallbacks, and "do X until Y" behaviours? If yes, a BT is usually the cleanest way to express it.
- Are your failure modes mostly global (pause/stop/override) or local (recover step-by-step)? Global suggests FSM; local suggests BT.
- Will you reuse task behaviours across multiple missions/products? If yes, BT composition often pays off quickly.
- Is "explainability to ops" a core requirement? FSM gives a clear "what mode am I in?" story; BT needs strong event logging to provide the same clarity.
- Do you expect the system to grow (more sensors, more tasks, more sites)? If yes, plan for hybrid early to avoid re-architecture later.
The Hybrid Pattern
The pattern that tends to hold up in operations is:
- FSM for high-level mission modes: what stage are we in, what's allowed, what's the safe behaviour
- BT for task execution inside a mode: how we run the task, how we retry, how we recover locally
Example: FSM mode is Inspect Conveyor, and the BT inside handles pre-checks → navigate → align → capture → validate → retry/fallback → report → continue route. This reduces transition complexity while keeping task logic reusable and testable.
What "Hybrid" Means in Practice
Hybrid is often described as "FSM on top, BT inside," but the important part is the contract between them.
The FSM owns: safety state (Paused, E-Stop, Manual override); mission phase (Dispatch, Navigate, Inspect, Return, Dock/Charge); global constraints (comms policy, time windows, battery limits); escalation and handoff rules.
The BT owns: task execution and retries; local fallbacks (reposition, retry, relocalise, replan); clear success/failure semantics for each task step.
And most importantly: the BT must report reason-coded outcomes back to the FSM. Not "failed," but "failed because localisation dropped below threshold for 45s," or "failed because capture quality failed after 3 retries." That's how you keep the overall system explainable to operations.
The Part That Really Matters: Fault and Recovery Strategy
Whatever you pick, decide up front:
- Safe stop vs degraded continue: what conditions force a stop, and what conditions allow "continue with caution"?
- Retry policy: what is retryable, how many times, with what timeouts/backoff?
- Fallback behaviour: what's the next best action if a step fails?
- Human handoff: when do we escalate to an operator, and what context do we provide?
- Observability: what events explain "what happened, why, what next"?
If those aren't explicit, you'll ship something that works in demos but fails under real interruptions.
Observability: What Ops Needs to Trust the System
Mission logic lives or dies on trust, and trust comes from being able to answer two questions quickly: what is it doing right now, and why did it do that?
At minimum, design for:
- Mode visibility (FSM): current mission mode and how it transitions
- Event timeline (BT + FSM): a chronological sequence of significant events (pause triggers, retries, recovery attempts)
- Reason codes: standardised short codes for common failures (e.g.,
NAV_LOCALISATION_LOW,CAPTURE_QUALITY_FAIL,SAFETY_ZONE_BREACH) - Operator context packet: when escalating, include the minimum context needed to act (location, last known state, last 10 events, sensor health summary)
If you don't build these from day one, you'll still build them later — under pressure — because operations will demand them.
Testing: How to Prove the Recovery Strategy Works
Most autonomy failures aren't "it can't navigate" — they're "it didn't recover the way we expected." A practical way to test mission logic is to simulate interruptions explicitly:
- Safety interruption tests: pause/resume from each relevant mission mode
- Timeout tests: navigation timeout, perception timeout, report timeout — confirm deterministic outcomes
- Degraded sensing tests: drop localisation confidence, inject occlusion/blurry frames, verify retry/fallback behaviour
- Blocked route tests: force replan, force no-route, verify escalation policy
- Payload health tests: mark sensor unhealthy mid-task, verify degrade/skip behaviour
And define success criteria in operational terms: percentage mission completion under interruptions; mean time to recovery; number of "unexplained" transitions (should trend to zero with good reason codes).
Common Mistakes
- Modelling only the happy path: treat failure and recovery as first-class behaviour, not "later."
- Mixing mission-mode logic with task details: keep modes and tasks separate — hybrid helps a lot.
- Silent failures: always emit a reason when a node/state fails; make it visible to ops.
- No test harness for interruptions: simulate timeouts, blocked routes, perception degradation, and sensor faults; verify recoveries deterministically.
A Quick Sizing Rule
If you're early in evaluation, you don't need to fully commit to a complex structure on day one — but you do need to avoid designs that force a rewrite later.
- If your system is mostly "modes" with a small number of exceptions, start with FSM-first and keep tasks simple.
- If your system is mostly "tasks" with lots of recoveries, start with BT-first but enforce strong naming/outcome conventions.
- If you expect to scale to multiple missions/sites/sensors, choose hybrid early and define the FSM↔BT contract up front.
The goal isn't a perfect diagram. It's an architecture that remains understandable as exceptions and requirements inevitably grow.
Implementation Checklist
- Define the mission modes (high-level) and the transitions between them
- List top failure modes for your environment (comms, dust, occlusion, blocked routes, sensor health, safety interruptions)
- For each failure mode, decide: safe stop vs degraded continue; retry count/backoff/timeout; fallback behaviour; escalation trigger and operator context required
- Choose architecture: FSM only (simple), BT only (task-heavy), or hybrid (common)
- Build observability: structured events, reason codes, and an event timeline
- Pilot with real interruptions: test under the conditions that usually get avoided during demos
How NXTGEN Fits
NXTGEN Autonomy supports mission orchestration and behaviour logic, including robust handling of triggers, retries, and safe recoveries. NXTGEN Inspect supports the inspection-data side — capture pipelines, analysis, dashboards, and alerts — integrated into the decision and action loop.